Tuesday, May 11, 2010

Contest # 2: Lets hear a shoutout for the 'Rammal's Photography and Digital Art Hub' *SESSION GIVE AWAY* contest!

Where to enter:

http://www.facebook.com/pages/Rammals-Photography-and-Digital-Art-Hub/276195494214?ref=ts#!/notes/rammals-photography-and-digital-art-hub/contest-2-lets-hear-a-shoutout-for-the-rammals-photography-and-digital-art-hub-s/125769764103768

How to enter:

  • Enter your name, a friend's name AND number your entry. E.g: 1 - *You* and *Your friend's name*.
    [If you FORGET to number your entry, random.org would not read your entry & you'd miss the chance of winning the shoot.]

  • You must *like* my fan page: http://www.facebook.com/pages/Rammals-Photography-and-Digital-Art-Hub/276195494214 & & share its link on your wall.
  • Only the residents of Islamabad/ Pindi are eligible.

  • Previous competition winners are not allowed to enter.

  • Random selection of contestants would be done by random.org

  • Last date to enter: May 25th, 2010

    What would the prize be?

  • Outdoor family portraits, Engagement shoots, Couple shoots, kids & Baby shoots - Anything! :)
  • The winner would be chosen from random.org on the 25th of May, 2010

    The package includes:
  • An hour session with a total of 4 people, at your chosen location.
  • 12 prints of size 5x7!
  • One web sharing CD (low res), watermarked 12 images!
::::A package worth total PKR 8500 Value::::

Monday, January 5, 2009

How to make your very own signature brushes in photoshop.

Hello people! :) We're learning signature brush making today!

Pre-requisites:

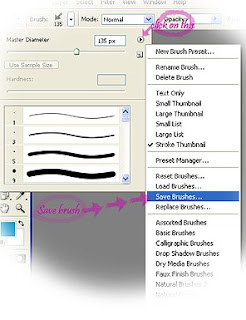
First of all save all the brushes that you have already loaded in photoshop. Don't know how to? Let me show you.

Follow 2 easy steps, shown in Fig. 1, remember to select the brush tool and then click on the brush present picker.


Fig. 1

After you hit the brush present picker, you'd see a tiny play button on the top right side. A drop down menu would appear infront of you. Scroll down and click on save brushes. That would save all the brushes that you already have. Make sure that you save the brush sets in the *brushes folder*, where you have your *photoshop application* installed.

Done saving the brushes? Delete all of 'em now so when you're creating new ones, you'd be able to save 'em individually.

Alright then, lets get to work! :)

Fig. 2
Starting the tutorial:


1) How to formulate a signature.
Select your favorite font and write down your name/ nick that you use for your photography. I've used two fonts here, if you like you can use only one.

Then use brushes to ornament your sign. I used these fairy brushes in this example. You can download them from deviantArt.

Fig. 3


2) Cropping the signature and saving it as a .jpeg image.

Now the fun bit.

3) Close all windows in photoshop and open the signature jpeg.

4) Go to Edit > Define brush present.

5) You'd see photoshop has picked up your signature and wants you to name it. Name it whatever you want to and save it.

6) Now go back to the brush present picker and you'd see that your signature brush has been added! :D \m/

7) Whoa! :D You have your very own signature now!

8) Save it like we did in Fig.2.

9) Dance about, you did it! :D haha


Hope you guys find it helpful! =)


Credits:

DeviantArt ( I'd try to look up the link of the artist whose tutorial I used for reference!)

Saturday, November 10, 2007

`Gold embraced Tutorial.

Hello people, thank you for appreciating my macro liquid photography!

Many of you asked me on flickr.com, how I captured this water drop and perfectly managed to get the refraction of the fabric behind it...

First things first (My camera settings):

* Camera model: SONY DSC-H5
* Camera type: Prosumer
* Manual mode: set on
* Closeup macro lens used: VCL - M3358
* External source used: 60 watt bulb to reduce noise in the Depth of field (DOF)

Exif data:

*
Shutter speed: 1/1000, 0.001 sec
* Aperture: F/4 ( Best Aperture to be used for high speed photography is the maximum value, because you need all the light you can for these kinda shots.)
* ISO Speed: 200 (You can use 100 too, the higher the ISO - more noisy the shot!)
* Exposure : 0/10 EV (Best EV between +0.3 to +0.7, these don't give the blowout-flash effects)
* Flash: Flash fired

My setup:

I used the same setup as I described in my earlier posts. I used the tap in my washroom, placed this table cloth behind it. I've mentioned the settings and the mode, on which I've taken this shot on; still you guys can also use the burst mode (The burst mode is best for high shutter speed shots, it allows one to take 3-5 action shots at a high shutter speed), unfortunately my camera doesn't support the flash function with that mode, so I have to make use of the normal mode available on the manual settings. I broke my 10 watt bulb, so I used an old lamp, which had a 60 watt bulb in it, this is what introduced the *gold rim* around the drop.

How did I do that?

Being a transparent medium, water is best to work with - that is when you want clear, solid refractions! It naturally forms different shapes and functions as a miniature lens that refract its surroundings. Through water, you can explore those tiny, complex worlds within a drop.

:: Key Pointer ::

You should always have a clear idea of these things while taking a shot, these help a lot in getting you that much desired result.

* What am I actually taking a pic of?
* What do I want in the shot?
What refraction do you want?

This time I used a fabric with a bold pattern, because I wanted a refraction of that in the water drops, and I wanted the motif to be in the centre of the drop. See, I narrowed down to how I wanted the shot; clearly stating my goal.

Missed drops?

Turning the tap on, I used a thin stream of water first for some try-out shots. Check if you're getting the desired refraction or not. Don't worry if you didn't! At first you would get lots of missed drop shots, some shots with the missing/blurred refraction even! If you think the motion of the water is fast for you to work on, check for a more suitable water speed.

Focus and explore different angles:

Keep a tight focus on the descending drops and shoot. Before getting the *Gold embraced* shot, I got shots like the ones on the right. The result that I wanted in the centre of the drop wasn't what I had in mind. So what did I do? :) I explored different angles like any other good photographer..and that is when I found the perfect angle that got me the much wanted refraction!

Picture composition:

I usually follow the rule of the thirds (If you want I can blog about picture composition too), that makes the shot more interesting. Keeping your object too centered makes it look too monotonous, so there!

I've explained most of the details in depth, hope it proves to be prolific for all of you! :)
Kindly do let me know your feedback through commenting on it. Thanks.
Till the next blog, tataz! :)

-- v1nz
Saturday, November 3, 2007

Thanks Oatmeal for granting permission to use the link here.

  • Oatmeal 2000's High speed Photography Tutorial:
    http://photos.soboring.org/High_speed_photography/
  • Here's a link to Oatmeal2000's photography: http://flickr.com/photos/oatmeal2000/

    This is an excellent tutorial guys, you would see that the setup here is again minimalistic yet the results are impressive. It would be better to use a tripod in low light situations and setups but If you can still balance your camera to stay sturdy that's alright too.
    Hope this helped! :)

    -- v1nz

Thursday, November 1, 2007

My lab.


This was the setup for taking the liquid macro shots while placing the photoalbum behind the water tap.
You can see the bulb, and the plastic glasses acting as a stage for the drops! :)
-- v1nz

Queries, I've been receiving lately:

1. Where do u put the picture so it reflect on the drop?
2. From where do u get the drops ?
3. What is ur camera settings ?


1. I used a pillowcase, I think fabric is much better than using paper as a background. The surface of the paper can reflect back the light of the flash and that sort of disturbs the image. Firstly you have to observe the motion of the falling drops and then place the fabric/ any picture beside or behind them. You would see at once that the falling drops have taken up the colors of the fabric/picture behind/ beside them...Secondly, you have to peer in closer at the drops (remember to keep an external light source, if you're taking shots in a place that isn't so well lit. I used an 8/11 watt bulb here.) When you would peer in the drop, your eye would try to focus on the activity *inside* the drop, eventually that curiosity would lead you to focus the same way through the lens of your camera. It all about focus and composition.
:) Remember to keep the fabric or any picture *inverted*, because the water drops work as lenses themselves and only then the upright image you desire would be achieved as *refraction* through 'em.

2. I use a normal bathroom or a garden tap. In meticulous macro and high speed photography, lighting is very important.

3. Like I stated before, I use manual settings with -0.3 EV flash, 1/1000 shutter speed (SONY H5 has certain limitations and the max shutterspeed mine offers is 1/1000, With SLRs and DSLRs a shutterspeed of 1/4000 is best to be used). Use a closeup lens, If you think the need arises!

Believe it or not, i'm a newbie too in this field - It has only been a year..I remember mailing people for advices and techniques and hardly anyone used to, and I know how frustrating that can be..so feel free to ask me whatever you have to about macro/liquid photography!
=)

-- v1nz


Hello everyone!

I'm starting a blog, so I can communicate in a better way with all of you.
The purpose of this blog is to share my photography experiences..I would try my best to answer all your queries, and in return we all can exchange photography tips or anything 'bout photoshopping too!
Thanks.

-- v1nz